FAQ
Problem 1 - I can't see the Moodle workspace!?
If you can't see the workspace in https://moodle.jamk.fi, I've added an self-enrollment key to the workspace:
- Data Networks - https://moodle.jamk.fi/course/view.php?id=13703
- Enrollment key (needs an Office365 @student.jamk.fi login): Click this link
Problem 2 - I can't see the videos!?
- You need to join the "Data Networks" -team in Microsoft Teams with your @student.jamk.fi -credentials. Click here to join!. The team membership gives you viewer permissions for the videos.
- You need to have an active login to https://o365.jamk.fi in the same browser you are using to browse the material
Info: Istructions how to manually search and join the team
-
Go to Microsoft Teams
-
Sign-in by using your @student.jamk.fi -email
-
Go to Teams on left bar/column
-
Top right write into the search bar: Data Networks
-
Click join
After joining the team, there is a 15-30 minute delay for the view permissions to be enabled
-
Do not press request access.
-
Wait
-
CTRL+SHIFT+R for full refresh. This causes the webpage to load fully/completely again.
Problem 3 - What is SSH?
Secure Shell (SSH) is an application and a protocol to connect to your server (or network device) from afar to administer it (by opening a shell/command-line interface)
SSH provides an encrypted connection through TCP/IP -networks to securely operate a device (be it server/switch/router/...).
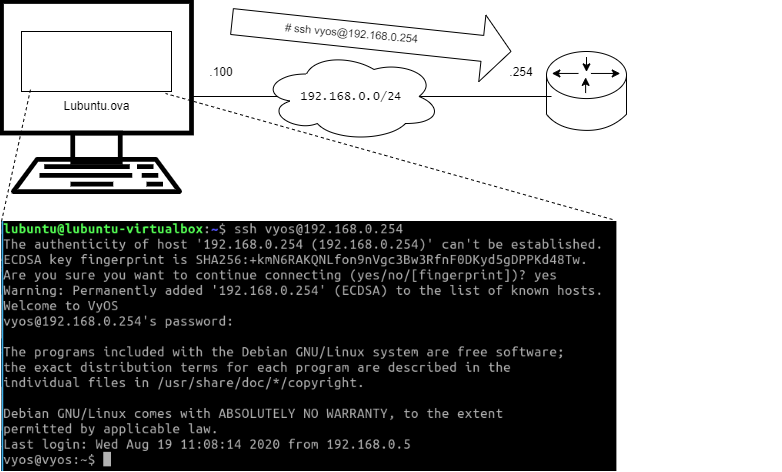
It is de facto tool of any IT administrator. You can read more at https://www.ssh.com/ssh/
Are you sure you want to continue connecting (yes/no/[fingerprint])?
SSH is a encrypted protocol relying on cryptographic encryption keys (a topic for Cyber Security).
Thus, when you are first connecting to a IPv4 address utilizing SSH, it likes to confirm that do you actually trust those cryptographic keys provided by the server.
lubuntu@lubuntu-virtualbox:~$ ssh admin@192.168.0.253
The authenticity of host '192.168.0.253 (192.168.0.253)' can't be established.
RSA key fingerprint is SHA256:Z4hGnYYiu93ecVLqwdPo6MOImslob2XpBlwWQry4n88.
Are you sure you want to continue connecting (yes/no/[fingerprint])
Our laboratory exercise environment is isolated from the Internet, thus it is highly unprobable that you are subject of an Cyber Attack. Thus you can accept the cryptographic keys by writing in yes and pressing Enter
@ WARNING: REMOTE HOST IDENTIFICATION HAS CHANGED! @
There might be cases in the exercises that you change the device/virtual machine using a certain IPv4 address, but still connect to it by using SSH. Each device has unique cryptographic key material, thus the change in those materials behind a singular IPv4 address is highly suspicius activity. If we would be in the Internet.
Luckily for us our exercise environment is quite separated from the Internet, thus we can do as the warning instructs us to do.
lubuntu@lubuntu-virtualbox:~$ ssh admin@192.168.0.253
@@@@@@@@@@@@@@@@@@@@@@@@@@@@@@@@@@@@@@@@@@@@@@@@@@@@@@@@@@
@    WARNING: REMOTE HOST IDENTIFICATION HAS CHANGED!    @
@@@@@@@@@@@@@@@@@@@@@@@@@@@@@@@@@@@@@@@@@@@@@@@@@@@@@@@@@@
IT IS POSSIBLE THAT SOMEONE IS DOING SOMETHING NASTY!
Someone could be eavesdropping on you right now (man-in-the-middle attack)!
It is also possible that a host key has just been changed.
The fingerprint for the RSA key sent by the remote host is
SHA256:Rj8b3blWH5h7XNEYO6qT81go/FIWYUiEhOrJTlOJsBM
Please contact your system administrator.
Add correct host key in /home/lubuntu/.ssh/known_hosts to get rid of this message.
Offending ECDSA key in /home/lubuntu/.ssh/known_hosts:6
  remove with:
  ssh-keygen -f "/home/lubuntu/.ssh/known_hosts" -R "192.168.0.253"
RSA host key for 192.168.0.253 has changed and you have requested strict checking.
Host key verification failed.
lubuntu@lubuntu-virtualbox:~$
Just run ssh-keygen -f "/home/lubuntu/.ssh/known_hosts" -R "192.168.0.253" to remove the old public key from the known_hosts file and reconnect by using ssh admin@192.168.0.253 once again.
Problem 4 - What is virtualization?
On virtualization generally and Lubuntu
Virtualization is a powerful tool in learning anything around IT.
Baremetal Hardware
Typical operating systems run on "baremetal hardware".
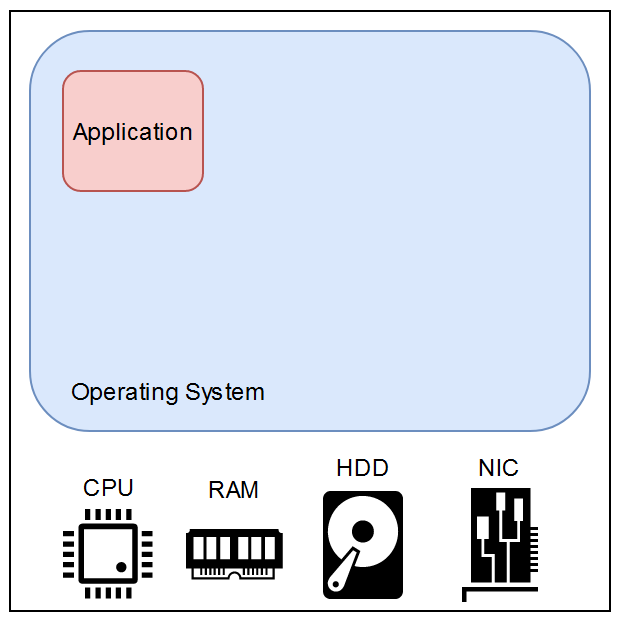
Notable components and acronyms:
- CPU - Central Processing Unit (Intel, AMD, ARM...)
- RAM - Random Access Memory (DRAM typically)
- HDD - Hard Disk Drive (SSD typically now)
- NIC - Network Interface Card (LAN, WLAN, ...)
Virtualization
Basic terminology
Virtualization removes the hardware (HW) from the Operating System (OS) ran on the device by adding a virtualization layer between the two. OSs ran on top of a virtualization layer are called Virtual Machines (VMs).
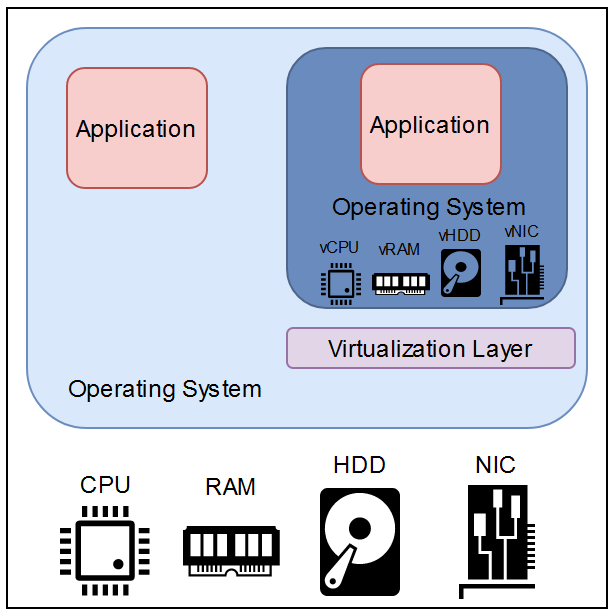
Notable components and acronyms:
- vCPU - virtual Central Processing Unit
- vRAM - virtual Random Access Memory
- vHDD - virtual Hard Disk Drive
- vNIC - virtual Network Interface Card
This is typically done by some virtualization software:
- VMware
- VirtualBox
- Kernel Virtual Machine - KVM
Sometimes the virtualization gives out the following terminology:
- Host OS
- OS of the physical computer
- Guest OS
- OS of the Virtual Machine (VM)
VirtualBox
VirtualBox is a Open Source Software (GPLv2 licence). It is really handy to provide a graphical user interface (GUI) for virtualization, but also a strong CLI -support.
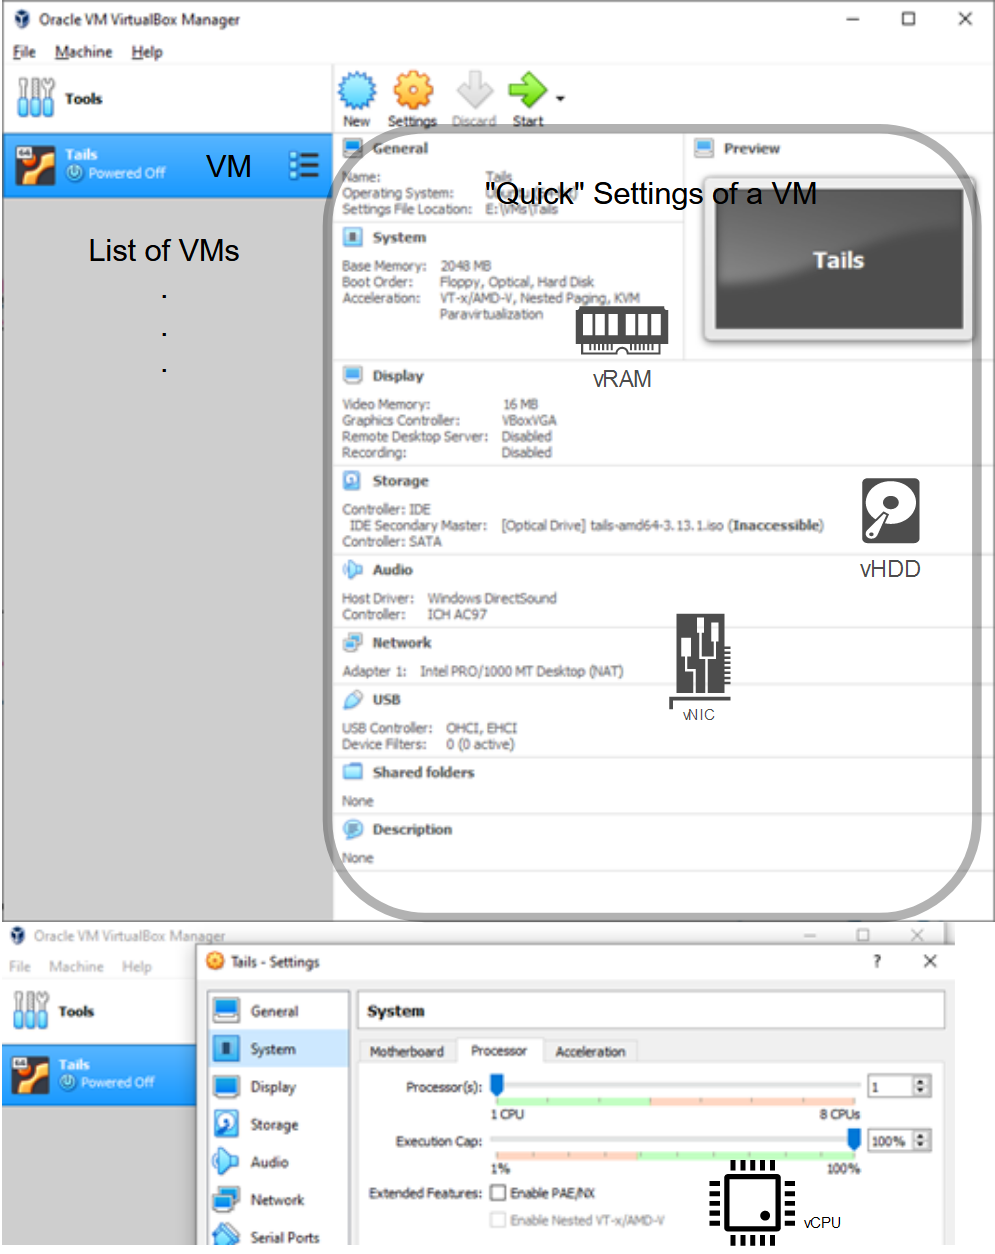
VirtualBox can be downloaded here: https://www.virtualbox.org/wiki/Downloads .
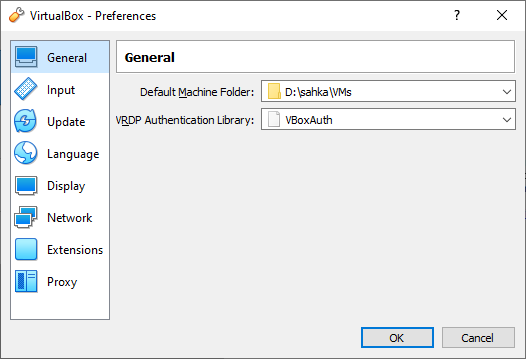
The virtual machines are installed to a certain folder on your host OS. Under "File -> Preferences" the "Default Machine Folder" can be set to point to a certain folder. In LabraNet this should be under your D:\
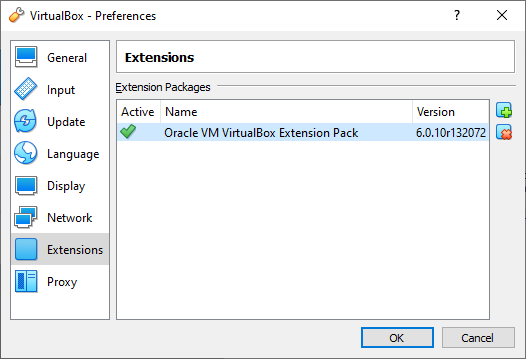
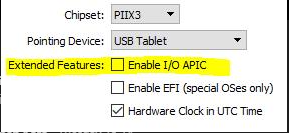
For seamless operation. The corresponding Extension Pack can be installed to provide a smoother experience. This can be done by downloading the extension pack and adding it to your Virtual Box installation through "File -> Preferences -> Extensions". See the figure below.
Problem 5 - AMD Ryzen -processors & switch.ova
There is a compatibility issue with AMD Ryzen -processors & switch.ova.
Success: Here is the solution
The switch boot ups and goes through a few "debugging" stages
- press
candEnter - type in
exitand pressEnter
Once the switch starts you can proceed as normal with the exercises.
Example: Visually the solution

Once the switch starts you can proceed as normal. I tested the virtual machines for basic trafficing (you need to enable ports etc as usual). Everything seemed to work.
Problem 6 - I can't access https://gitlab.labranet.jamk.fi
Your JAMK credentials might not have been generated to LabraNet yet. Please try the self-service portal: https://student.labranet.jamk.fi/password-resets/
If this doesn't work, contact the teacher.
Problem 7 - Virtual Machines won't boot
The motherboard doesn't have virtualization enabled. Depending on your motherboard type... you need to boot into BIOS/UEFI and find the correct sheet/tab where the virtualization can be enabled.
Examples of the Errors in this case:
Bug: AMD error message
Failed to open a session for the virtual machine Lubuntu.

Not in a hypervisor partition (HVP=0) (VERR_NEM_NOT_AVAILABLE).

AMD-V is disabled in the BIOS (or by the host OS) (VERR_SVM_DISABLED).

| Result Code:  E_FAIL (0x80004005) | Component: ConsoleWrap | Interface:IConsole {872da645-4a9b-1727-bee2-5585105b9eed} |
Bug: Intel error message
"The hardware virtualization is enabled in the Acceleration section of the System page although it is not supported by the host system. It should be disabled in order to start the virtual system."
Virtualization Technology (VTx) has to be enabled in BIOS/UEFI
Problem 8 - I am an MAC user and the template repository doesn't import
Does your MAC unzip .zip files automatically?
The file needs to end in .tar.gz
Unfortunately Safari Browsers (by default?) unzip the .gz end from the file. Making it invalid when importing back to https://gitlab.labranet.jamk.fi
Follow these instructions to fix this issue:
- Open Safari browser
- Click Preferences
- Under the General tab, uncheck the option *Open "safe" files after downloading"
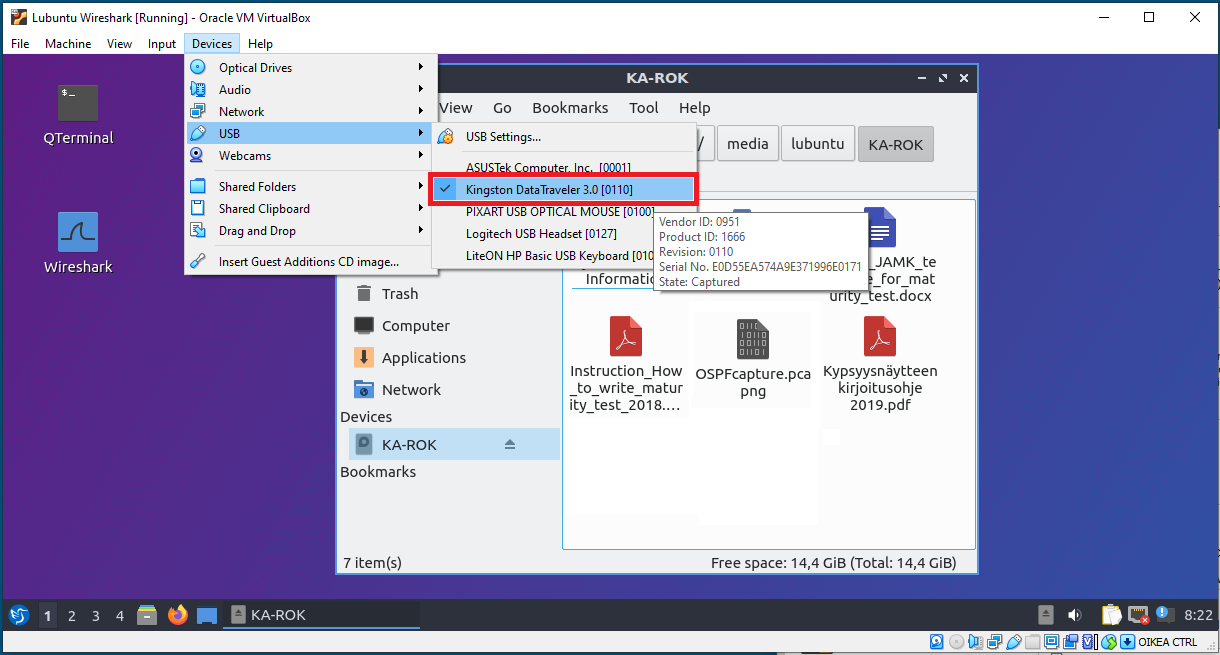
Problem 9 - I want to transfer files between my Host OS and Guest OS
You can insert an USB device and move it between the virtual machine and the host operating system
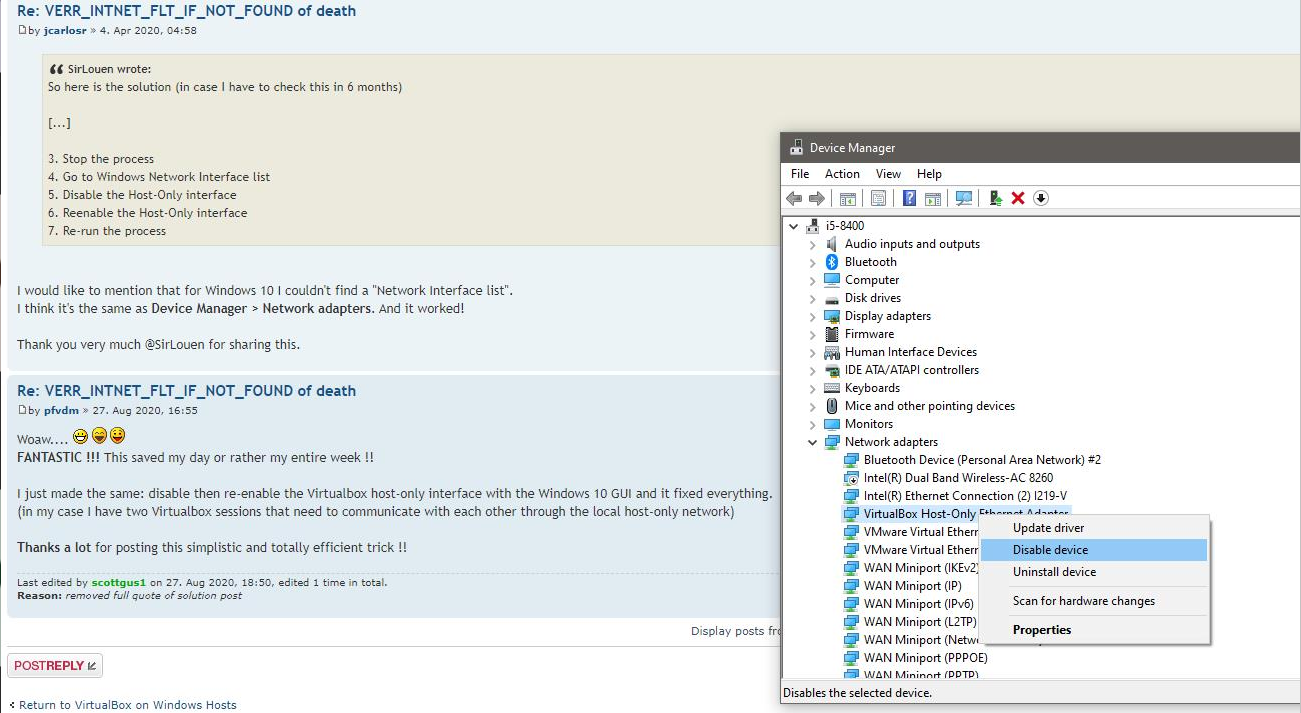
Problem 10 - VERR_INTNET_FLT_IF_NOT_FOUND_of_death
Sometimes the switches do not start because - VERR_INTNET_FLT_IF_NOT_FOUND_of_death
Error message
Failed to open a session for the virtual machine Switch 1. Failed to open/create the internal network 'HostInterfaceNetworking-VirtualBox Host-Only Ethernet Adapter' (VERR_INTNET_FLT_IF_NOT_FOUND). Failed to attach the network LUN (VERR_INTNET_FLT_IF_NOT_FOUND).
Result Code: E_FAIL (0x80004005) Component: ConsoleWrap Interface: IConsole {872da645-4a9b-1727-bee2-5585105b9eed}
Success
 * source:
Problem 11 - Problems importing the lubuntu.ova -file
Bug: There have been reports of different problems while importing the lubuntu.ova file.
I'll try to ... slowly... document all of the different reasons.
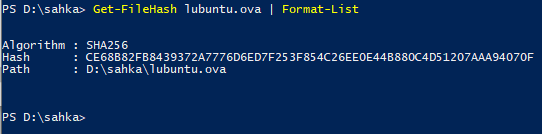
Success: Verify if the lubuntu.ova has been downloaded successfully
This requires a bit of expertise...
Press WIN button and type in Powershell.
Start the program and type the command below (in the right folder).
PS D:\sahka> Get-FileHash lubuntu.ova | Format-List

Algorithm : SHA256
Hash      : CE68B82FB8439372A7776D6ED7F253F854C26EE0E44B880C4D51207AAA94070F
Path      : D:\sahka\lubuntu.ova

PS D:\sahka>
Example: As a screenshot
Problem 12 - How to save the configuration from the network devices?
The network devices do not support your mouse, thus selecting & copying text from them can be a hassle. Here is a video to demonstrate how to make an SSH -connection from your lubuntu.ova and recover the configuration from there.
Spoken in Finnish. ENABLE ENGLISH SUBTITLES
Example video of the saving process
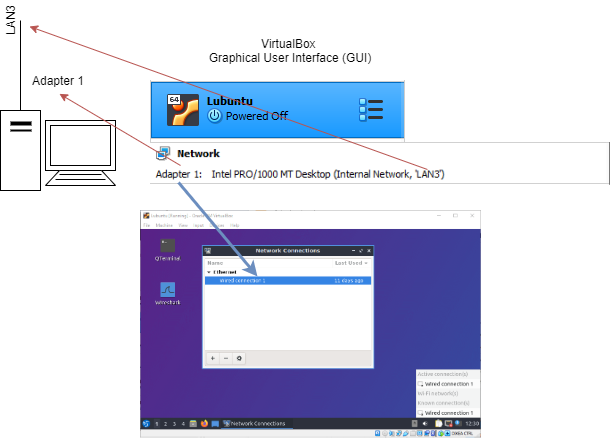
Problem 13 - How do the (Network) Adapters in VirtualBox work?
Lubuntu
Lubuntu acts as our desktop workstation in the network. It has only one adapter. This reflects that our day-to-day computers are typically connected only to one network at a time.
Here is the visualization of
- how the virtualization sees the Network Interface Card
- how the operating system sees the Network Interface Card
- how it is drawn/visualized by our topology plans
Switch
Switch is our OSI Model Layer 2 network device in the exercises. It has multiple ports/adapters/Network Interface Cards. This reflects that our switches can connect multiple workstations.
Here is the visualization of
- how the virtualization sees the Network Interface Cards (called
Adaptersin VirtualBox) - how the operating system sees the Network Interface Cards (called
portsin EXOS) - how it is drawn/visualized by our topology plans
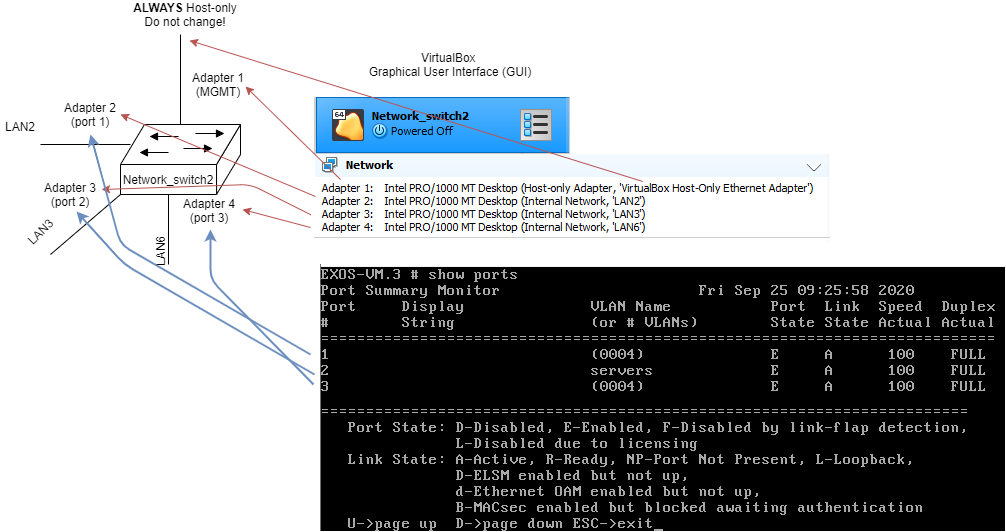
The first adapter of the switch.ova virtual machine is always reserved for the physical Management port (MGMT)
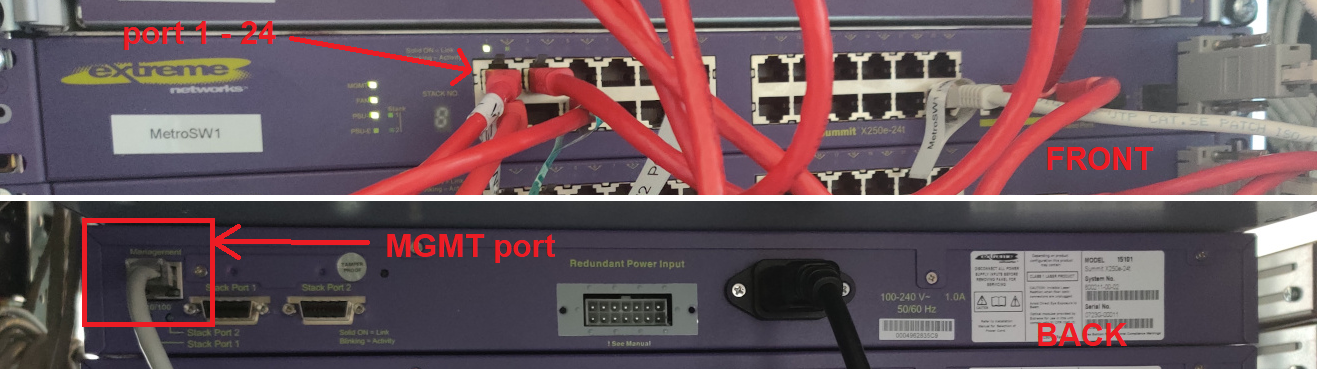
This is the out-of-band management port of the switch discussed in TCP, UDP and Controlling our Network Configuration (SSH, HTTP) - Remote connections on week 10.
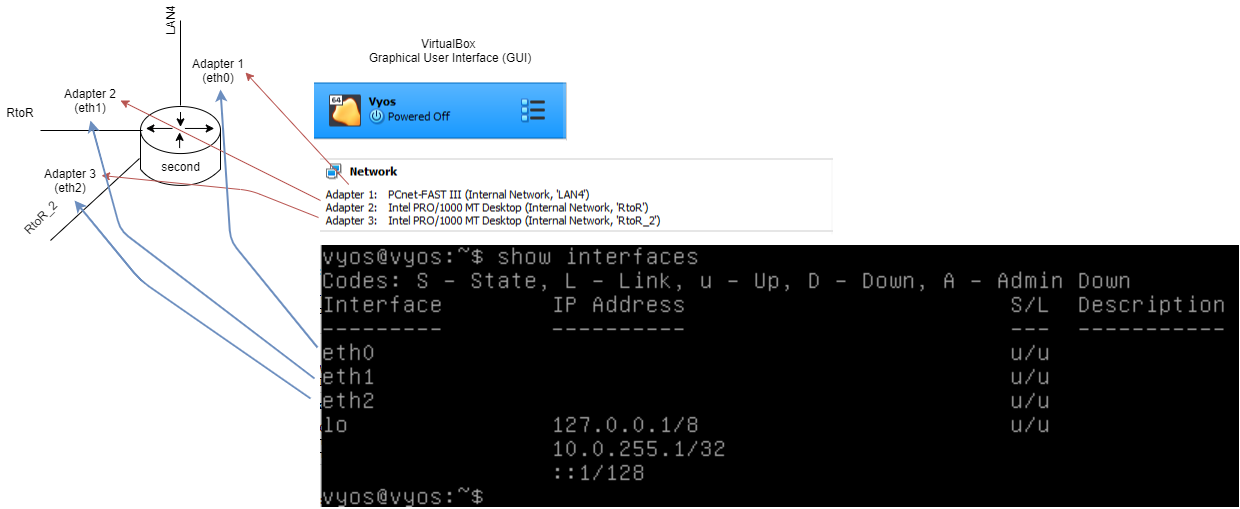
Vyos
Router is our OSI Model Layer 3 network device in the exercises. It has multiple adapters. This reflects that our routers can route between multiple networks.
Here is the visualization of
- how the virtualization sees the Network Interface Cards
- how the operating system sees the Network Interface Cards
- how it is drawn/visualized by our topology plans
Problem 14 - I typed wrong/have wrong settings! How can i unconfigure my configure?
Commands for deleting/changing configuration. In order of appearance in the material.
Enable/disable port
enable port <#>
disable port <#>
Create / delete VLAN
create vlan <name>
delete vlan <name>
Change VLAN name/tag
configure vlan <name> tag <new_tag>
configure vlan <name> name <new_name>
Add/delete VLAN to port tagged/untagged
configure vlan <name> add ports <#> <untagged/tagged>
configure vlan <name> delete ports <#> <untagged/tagged>
Configure/Unconfigure a VLAN IP address on a switch
configure vlan <name> ipaddress <x.x.x.x/xx>
unconfigure vlan <name> ipaddress
set/delete an IP address of an interface on the router (Vyos)
set interfaces ethernet ethX vif <tag> address <x.x.x.x/xx>
delete interfaces ethernet ethX vif <tag> address <x.x.x.x/xx>
Configure/Delete a default route on a switch
configure iproute add default <ip of router vif interface in network devices vlan>
configure iproute delete default
Enable/disable SSH on a switch (EXOS)
enable ssh2 port 22
disable ssh2
Enable/disable SSH on a router (Vyos)
set service ssh port <number>
delete service ssh port <number>
Set DHCP configuration and deleting
set service dhcp-server shared-network-name VLAN5 subnet 192.168.0.0/24 default-router 192.168.0.254
set service dhcp-server shared-network-name VLAN5 subnet 192.168.0.0/24 range PCs start 192.168.0.2
set service dhcp-server shared-network-name VLAN5 subnet 192.168.0.0/24 range PCs stop 192.168.0.250
delete service dhcp-server <add parameters if you want to specify what to delete>
e.g. delete service dhcp-server shared-network-name VLAN5 deletes the whole DHCP configuration for a given subnet
Setting/Deleting a static route on the router (Vyos)
set protocols static route <subnet> next-hop <how to get there / next-hop>
delete protocols static route <subnet>
Adding/Deleting VLANs from a Spanning Tree
configure stpd s0 add vlan <name> ports all
configure stpd s0 delete vlan <name> ports all
Configure/Unconfigure Spanning Tree switch priority
configure stpd s0 priority <value>
unconfigure stpd s0 priority <value>
Enable/Disable Spanning Tree on a switch
enable stpd s0
disable stpd s0
Setting/Deleting OSPF router-id on a router (Vyos)
set protocols ospf parameters router-id <x.x.x.x>
delete protocols ospf parameters router-id
Setting/Deleting loopback interface
set interfaces loopback lo address <x.x.x.x/32>
delete interfaces loopback lo address
Setting/Deleting a subnet on an OSPF area (enables/disables OSPF Hello & Advertises the subnet)
set protocols ospf area 0 network <x.x.x.x/xx>
delete protocols ospf area 0 network <x.x.x.x/xx>
Setting/Deleting firewall configuration
set zone-policy zone <name> default-action drop
delete zone-policy zone <name>
set firewall name LAN_to_WAN default-action drop
set firewall name LAN_to_WAN enable-default-log
set firewall name LAN_to_WAN rule 10 action accept
set firewall name LAN_to_WAN rule 10 destination port 80
set firewall name LAN_to_WAN rule 10 protocol tcp
set firewall name LAN_to_WAN rule 10 log enable
set firewall name LAN_to_WAN rule 11 action accept
set firewall name LAN_to_WAN rule 11 destination port 443
set firewall name LAN_to_WAN rule 11 protocol tcp
set firewall name LAN_to_WAN rule 11 log enable
set firewall name LAN_to_WAN rule 20 action accept
set firewall name LAN_to_WAN rule 20 protocol icmp
set firewall name LAN_to_WAN rule 20 log enable
set firewall name LAN_to_WAN rule 30 action accept
set firewall name LAN_to_WAN rule 30 destination port 22
set firewall name LAN_to_WAN rule 30 protocol tcp
set firewall name LAN_to_WAN rule 30 log enable
set firewall name LAN_to_WAN rule 40 action accept
set firewall name LAN_to_WAN rule 40 destination port 53
set firewall name LAN_to_WAN rule 40 protocol udp
set firewall name LAN_to_WAN rule 40 log enable
delete firewall name LAN_to_WAN - delete whole rule table LAN_to_WAN
delete firewall name LAN_to_WAN default-action drop delete single definition in the rule table LAN_to_WAN
delete firewall name LAN_to_WAN rule 10 - delete whole rule 10 in rule table LAN_to_WAN
delete firewall name LAN_to_WAN rule 10 destination port 80 - delete single definition in rule 10
Setting/Deleting NAT configuration
set nat source rule 10 outbound-interface eth0
set nat source rule 10 translation address masquerade
set nat source rule 10 source address 10.0.0.0/16
delete nat source rule 10 - delete whole rule
delete nat source rule 10 outbound-interface eth0 - delete single definition from rule 10
set nat destination rule 10 destination address 132.35.66.10
set nat destination rule 10 inbound-interface eth0
set nat destination rule 10 translation address 10.0.10.8
delete nat source rule 10 - delete whole rule
delete nat source rule 10 inbound-interface eth0 - delete single definition from rule 10
Enable/disable HTTP on a switch (EXOS)
enable web http
disable web http
Enable/disable HTTPS on a router (Vyos)
set service https listen-address <IPv4 address on the Router - e.g. loopback>
delete service https
Configure/delete IPv6 configuration
set interfaces ethernet eth0 vif 5 address 2001:dead:beef:5::1/64
delete interfaces ethernet eth0 vif 5 address 2001:dead:beef:5::1/64
set protocols ospfv3 parameters router-id <x.x.x.x>
delete protocols ospfv3 parameters router-id <x.x.x.x>
set protocols ospfv3 area 0.0.0.0 interface <interface>
delete protocols ospfv3 area 0.0.0.0 interface <interface>
Configure/delete BGP configuration
set protocols bgp 111 neighbor 2.2.2.2 remote-as 222
delete protocols bgp 111 neighbor 2.2.2.2
set protocols bgp 111 network 1.1.1.0/24
delete protocols bgp 111 network 1.1.1.0/24
set protocols bgp 111 redistribute ospf
delete protocols bgp 111 redistribute ospf
set protocols ospf redistribute bgp metric-type 2
delete protocols ospf redistribute bgp metric-type 2
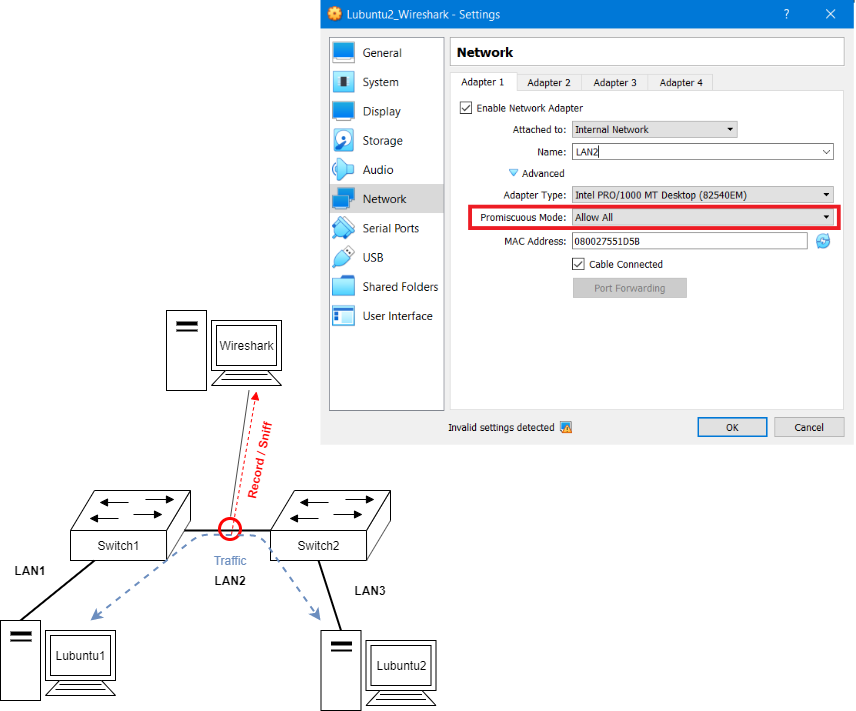
Problem 15 - What does wireshark do "visually" / "as a drawing"?
Wireshark Lubuntu attaches itself to a "wire" (internal network/<wire>) and sniffs the traffic traversing that line.
Problem 16 - How can I move virtual machines from one computer to another?
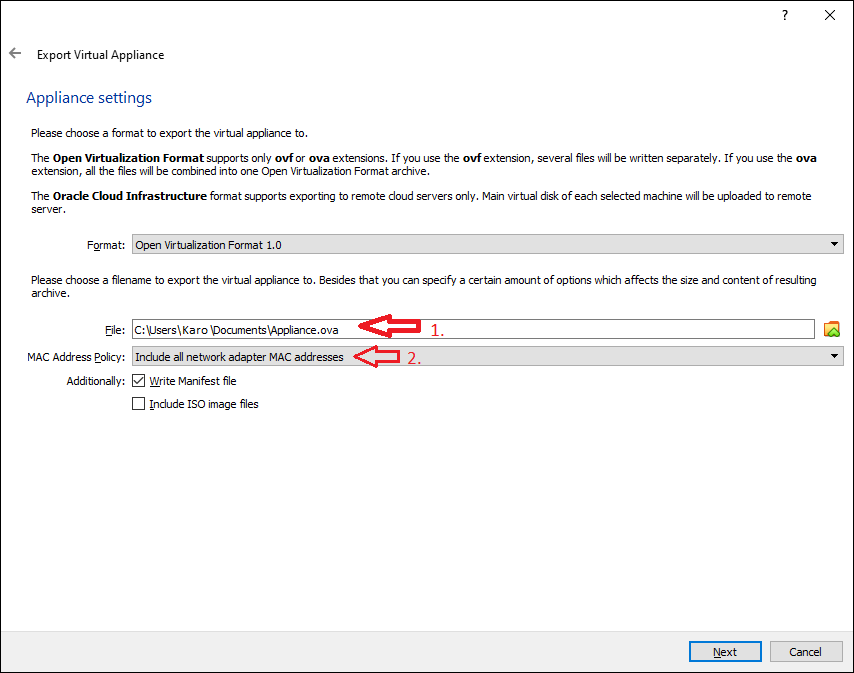
Select the virtual machine(s) you want to export and select File -> Export Appliance....
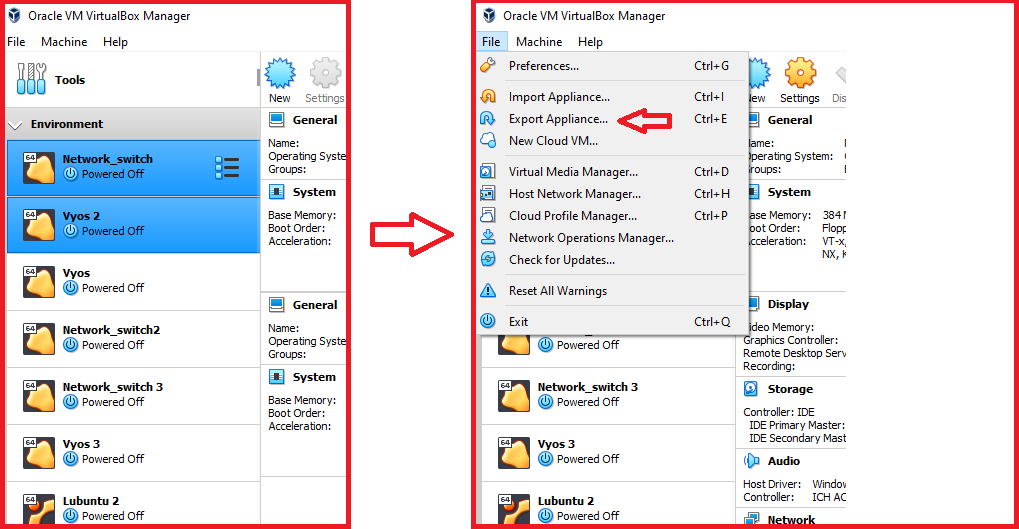
You can add more VMs to the export if you wish, but the selected will be automatically highlighted.
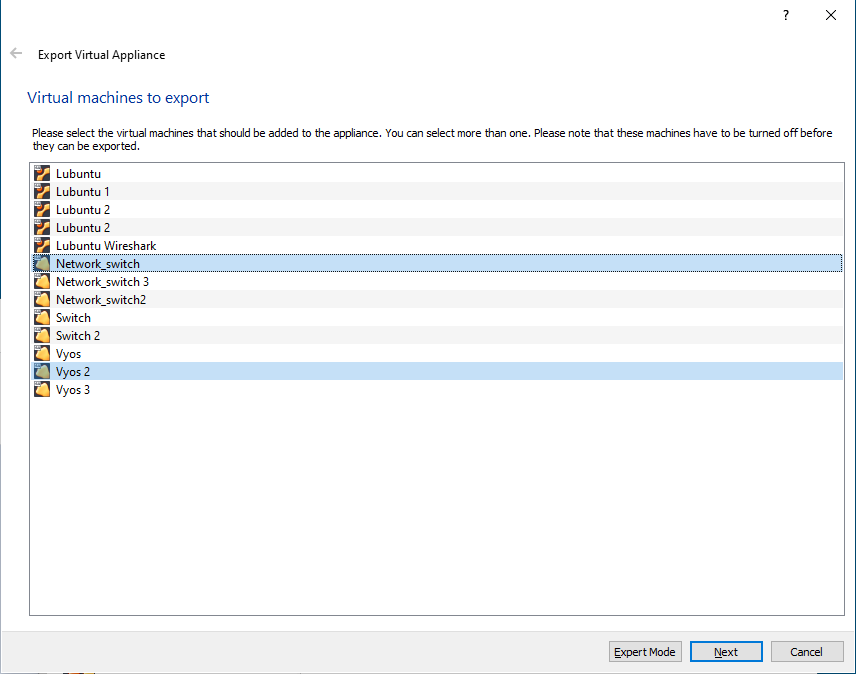
Select the folder where the export file (.ova) will be saved (step 1). Remember to Include all network adapter MAC addresses (step 2).
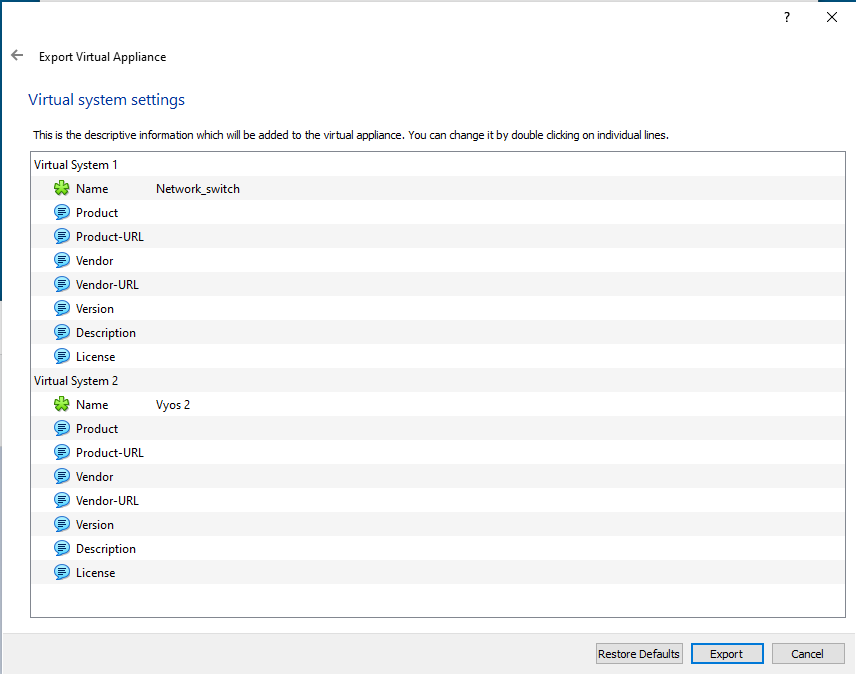
In the following window you do not need to add any information. Just press Export.
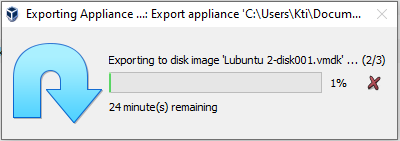
The Appliance.ova is formed... it takes time based on how many virtual machines you export (the file will be as big also).

You can now move the Appliance.ova file to a transfer media suitable to you (e.g. USB stick/harddrive) and copy the Appliance.ova file to the new physical computer.
Import the Appliance.ova on the other physical computer, and remember to Include all network adapter MAC addresses
Problem 17 - Vyos virtual machine lost its configuration
Remember to always poweroff the vyos device.
If the vyos is blank -> return an IP address to it and use load http://<lubuntu-vm-ip>/<configuration-file>
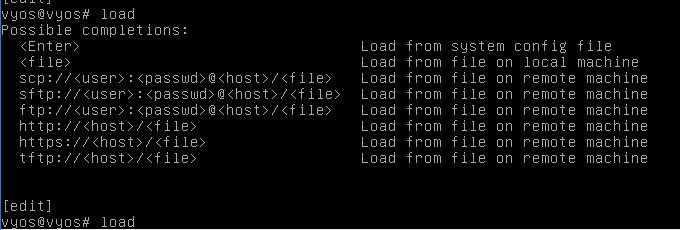
The configuration file needs to be in /var/www/html/ -folder of the lubuntu VM.
Problem 18 - DMA interrupt recovery
This has been located with older i5 processors.
DMA interrupt message on switch startup
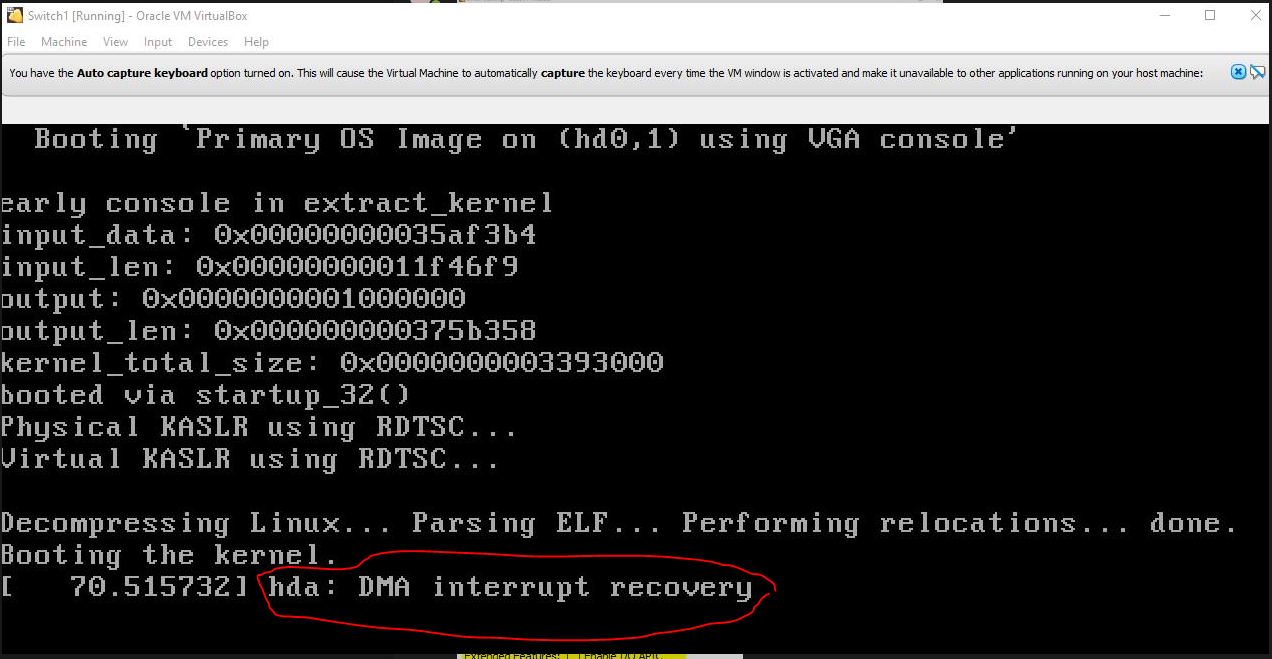
DMA interrupt solution
Problem 19 - Exam graded me Rejected even thought i got over 50% right!?
Question: Hi! I took the Exam test for data networks and I got points (over) 15/30, however the exam graded me Rejected!? Wasn't 50% enough for a passing grade!?
Answer: If you've returned 5 exercises in the Moodle return boxes (and they have been graded Accpeted), you'll be numerically graded. This means your limit for passing the exam is 15 / 30 points (50% correct). Unfortunately the Exam system only supports one "passing limit" and it has been sit with 70% = 21/30 points (for Approved/Rejected grades without returned exercises). The points received within Exam will be went through & fusioned with the returned exercises in Moodle at the end of the course. **No need to be worried even thought Exam tells you "Rejected". **
Problem 20 - Windows 11 disable Memory Integrity
Virtualization uses memory though the operating system. It might be necessary to disable Memory Integrity in the Windows 11 operating system. You can place it back on after the exercises.
Device protection in windows security
To access the features described below, tap the Windows Start button, type windows security, select it from the results, and then select Device security.
Memory integrity
Memory integrity is a feature of core isolation. By turning on the Memory integrity setting, you can help prevent malicious code from accessing high-security processes in the event of an attack.
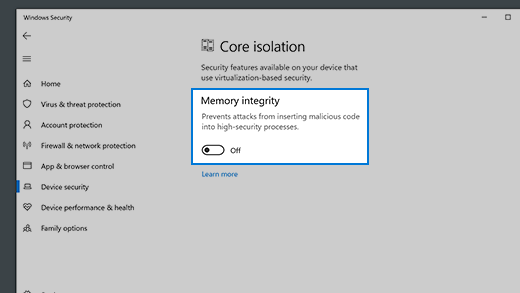
- Source: Microsoft
Problem 21 - I want to do the exercises in the classroom outside of contact hours. How can I see the room reservation situation?
Laboratory Network classrooms are quite available.
Method 1: https://opiskelija.peppi.jamk.fi - requires login
- Browse to https://opiskelija.peppi.jamk.fi
- Login
- Press: Calendar
- Goto
Room reservation - Delete Persons
by pressing x - Add Rooms (e.g. D331)
- Browse to the correct week.
Method 2: https://lukkarit.peppi.jamk.fi - does not require login
- Browse to https://lukkarit.peppi.jamk.fi
- click on top right -> EN
- click Location search
- type in the classroom you want (e.g. P2_D331) and press Search
- Press + Add
- Press Hide search results
- browse through the weeks to see the availability of a classroom
- The Lutakko campus is open Dynamo main entrance, On weekdays, Mon–Fri 7.30am–6.00pm as stated here: https://www.jamk.fi/en/contacts/lutakko-campus. I think the campus needs to be empty by 8.00pm (20:00) and as the alarms go on for the night.
Problem 22 - I want personal guidance in a Teams one-to-one -chat
Unfortunately this model does not scale from the teachers perspective. The course has ~400 to ~600 students per year. If you count the amount of errors & chat messages x students (x different courses)... you are facing a teacher burnout.
Course of action:
- Check the Data Networks teams channel for your error message (Teams has a search functionality within it!!!), because most probably you are not a unique unicorn with your error
- Ask your study groups channels, if the general Data Networks teams channel is too scary. Communications & Team-working is a part of the learning objectives of an engineer eventhought these labs are done & returned as individuals.
- If no clear answer can be found, start a thread about the error on Data Networks -teams
- some teacher will respond as soon as they can
- Enjoy the answer and the knowledge that now this error has not been buried in the tombs of an one-to-one chat
(e) The Programme Outcomes are described here separately for both Bachelor and Master Degree programmes with reference to the following eight learning areas:
Knowledge and understanding;
Engineering Analysis;
Engineering Design;
Investigations;
Engineering Practice;
Making Judgements;
Communication and Team-working;
Lifelong Learning.
Problem 23 - I own an Apple laptop
Current exercises can be done with Apple Intel based laptops, only if you have enough memory.
Current exercises can't be done with Apple Silicon based laptops